How to Transfer Facebook Photos to Google Photos
Facebook and Google Photos are the two platforms we can use on the go. However, Facebook is kind of ugly when managing and sending pictures. Because you will first need to download your FB picture and videos then upload them to a new platform etc. Google Photos, on the other hand, is the most reliable, easy-to-use and share, and manage image and videos app. You can have the Google Photos app installed on your phone and can use it on your PC too.
Note that the process is automatic. There is no need to manually download a copy of your FB data backup and upload it to Google Photos.
Facebook won’t let you do some important things. Such as you cannot share your specific photos via a link. While Google Photos will let you do it in seconds. You can simply select your pictures, tap the share button, and select Create a link. That is why Google Photos is even better and easy to manage and share our pictures, etc.
Also, Google Photos can let you upload high-quality unlimited pictures. Thus you are gonna make your pictures safe forever and make them easy to share and create links for specific ones. Though you can access your Google Photos simply by opening the Photos application on your Android phone.
In this guide, I will show you the easy procedure of transferring your FB videos and pictures to Google Photos. I am going to include screenshots for each step to easily understand and make this a time-saving article. So without further talking nonsense, let’s get to the procedure…
In This Article
Updated: How to Transfer Photos from Facebook to Google Photos
In the latest Facebook design (2023), the user interface looks modern and lots of users may have confusion while doing so. Actually, now you can transfer your Facebook photos to Google, Dropbox, Google Docs, and Kooper. Here is how to do it transfer all your Facebook photos to Google:
Click the drop-down arrow and then Settings & Privacy. Now click Settings. Click the Your Facebook Information on the left sidebar. Then click “View” next to the “Transfer a copy of your information” option. Select Google Photos, Connect your account, and Start the Transfer. That it’s all of it.

Transfer Facebook Photos to Google Photos on PC
Facebook easily lets your transfer a copy of your data to other platforms. However, the choice is your move those pictures and videos of you at the same time. Moreover, there is an easy built-in tool developed by FB years ago.
The tool is known as “Your Facebook Information”. Well, you can use it for other things as well. Such as restoring lost Facebook messages etc. So the best thing is, you don’t need to use any third-party and untrusted tools and extensions to do it for you.
However, you are on Facebook because you do trust the platform. Because you have your email there, your phone number, and related information. To be honest, I don’t, because as far as I know they are sharing our data and selling it over the internet anonymously. Well, who knows but it could somehow be true. Anyway, that is not our topic.
My concern is, there is a requirement for transferring or moving pictures from FB to Google. That is you must have signed with Gmail in your Chrome browser. If not they will ask for the authentication. So you may need to keep this in mind before proceeding.
Other than that, all you have to do is to follow the below simple steps in this article. You can use your computer for the automatic transfer, but on a mobile device, the procedure is different and manual. Here is how to do it:
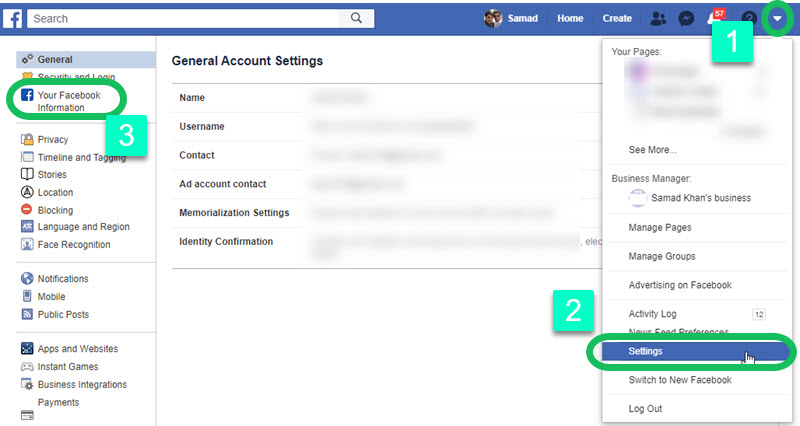
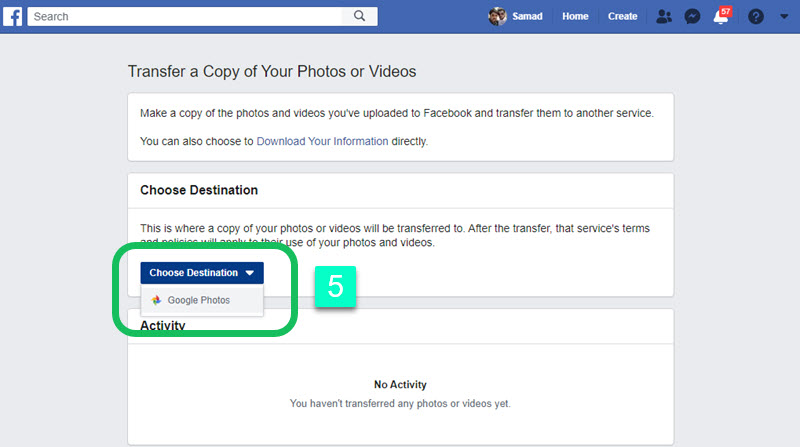
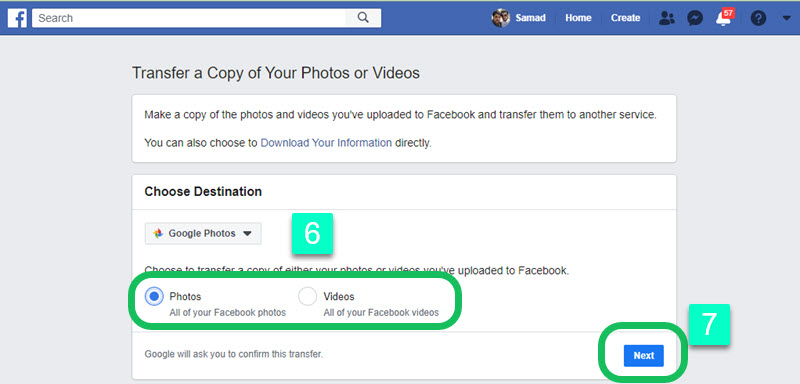
Go to facebook.com first. Then click the drop-down little arrow then Settings. In the new Facebook design, click the drop-down arrow, then Settings & Privacy, and click Settings. Click Your Facebook Information on the left. Now click the View option next to Transfer a Copy of Your Photos and Videos. Enter your FB password to confirm the action and hit the Continue button. On the transfer page, select your Destination as Google Photos. Select the All Photos or Video option then click Next. Now sign in with your Google Account and Confirm the choice. In the last step, click the Confirm Transfer button on the Destination page, that is it.


In the background, Facebook will now automatically create a copy of your photos or videos and then transfer them to Google. On the same Transfer page, you can choose to download a copy of your information directly and upload it to Google manually if you want to.
The choice is totally yours. Once the transfer is complete you may get a notification. Remember once you start using Google services, you are agreeing to their terms and conditions. However, you can check the transfer status by getting into your G Photos app.
Transfer Facebook Photos to Google Photos on Mobile
You can use the Facebook app in order to do so. The procedure is now automatic as it wasn’t before. Thanks to Facebook for implementing such a feature in the app too. However, you will need to do it with the same steps mentioned above. But the procedure is slightly different. Don’t worry I am here to help.
However, it’s simple and easy. You can use the official Facebook app on your smartphone for the process. Alternatively, you can your web browser on your mobile and use it in desktop mode. Then you can follow the above method for the automatic transfer.
If you wanna do it anyway use the Facebook app. First of all download and install the latest Facebook app from Play Store. Then there are the steps to follow:
Go to your Facebook app and tap Menu. Tap Settings & Privacy then Settings. In the Settings navigate to the “Your Facebook Information” section. Now tap the Transfer a Copy of Your Information tab. Confirm the action with your password the Select Destination as Google Photos. Select Photo or Video, then you will be asked for authentication of your Google account. Simply follow the on-screen instruction and allow everything. Finally, tap the Confirm Transfer option and you are good to go.

Once you hit that confirm transfer button. Facebook will automatically start transferring your select data to another service. As you should have selected Google Photos. Moreover, if you are curious to know what going on in the background. Then open your Google Photos app on your device and check if the is being completed. Remember that data transfer may take time as per the number of photos and videos. Sometimes it can last longer than usual, so please be patient with that.
You are so lucky nowadays. Because it was never possible to do such action using your Facebook app. However, as of now, it’s easier than ever to rest on the go from your mobile phone. But remember before proceeding, you must update your Facebook to its latest version. This will ensure that you might not have any trouble while transferring your media to Google Photos.
Alternatively, you can download a backup of your Facebook data including your pictures and videos. Keep it in a safe folder on your computer. Thus you may need to in the future, in case of losing your Facebook account, etc. Taking care of your personal thing has always been a perfect idea.
To download a copy of your information, simply follow these steps: First of all login to your FB account then click the drop-down menu option at the top right corner. After that click the Settings option and then Your Facebook Information from the left navigation menu. Click the View option next to Download Your Information. Select the date range, format, and quality then choose which information you want to download. Once you do the selection then click the Create File option.
You will get an email from Facebook that a copy of your information is available to download. You can simply click the link in the email or visit the same place again. There you will find a download copy of your information in the Available Copies tab. Simply download the information and you are good to go.
How long does it take to transfer photos from Facebook to Google Photos?
The time of the transfer may vary and depends on the number of photos and their sizes. Usually, it takes about an hour for up to 100 Facebook photos to show up in Google Photos. If you have thousands of photos, then you should wait for about 3 days. However, the overall process is automatic and you may check it after a day or two for the whole process to be completed.

