How to Make Your Facebook Account Private (2024)
You have full control over your Facebook account privacy. Just like making an account private on Instagram, Facebook doesn’t have a simple button to let you do that. While it’s a big social media giant platform, there are hundreds of settings and each one needs your attention, especially when it comes to our privacy on social media. Some settings are confusing and some are easy to control. However, from now on, you won’t have much but you will manage your account privacy in seconds.
If you do know Facebook a little bit, then I will not waste your time. Let me show you one quick setting, which is Facebook Privacy Shortcuts. You can simply get there and follow the onscreen instructions one by one. The Privacy Shortcuts option is available under Settings and Privacy in the Menu. However, if you wanna follow along, then follow me. At the end of this article, you will make your Facebook account or profile as private as possible. So, let’s get started…
In This Article
How to Make Your Facebook Profile Private
Facebook Privacy Shortcuts is the tool you need to control your privacy and make your account private. To access the tool, Go to Menu then click Settings and Privacy, and then Privacy Shortcuts. Go through each setting one by one to quickly manage things over there and make your account private.
If it is just about a message, then go ahead and manage your Who Can Message Me settings. However, you can make any changes and revert back if you want to. By the way, here is the Facebook Stories Privacy Settings Guide. Thus In this part of the article, I will show you how to make your Facebook account or profile private as much as possible. So, please follow me along:
Updated: Lock Your Profile to Make it Completely Private
In the latest Facebook app update, there is a lock profile option. You can simply lock your Facebook profile to make it completely private in 2023. Here is how to private Facebook account:
In the Facebook app, tap Menu (three lines at the top right). Go to Settings & Privacy then Settings. Now tap Profile Settings and select Profile Locking. Tap the Lock Profile button, and that is it. You are good to go. Now your Facebook profile is completely private.
If you wanna take manual steps for each and every section to extra privacy on the platform then follow simple steps…
Make Your Profile “About” Section Private
When someone first visits your profile on Facebook they see what you share publically, for example, Your About Information. The Your About section includes Bio, Your Intro, Hobbies, Account Overview, work, and Education, Place You Lived, Contact and Basic Info, Family and Relationship, Details About You, and Life Events. The About section further includes your phone number, email address, Gender, Birthday, etc. However, you can make the About Info on your Facebook profile private by following these steps:
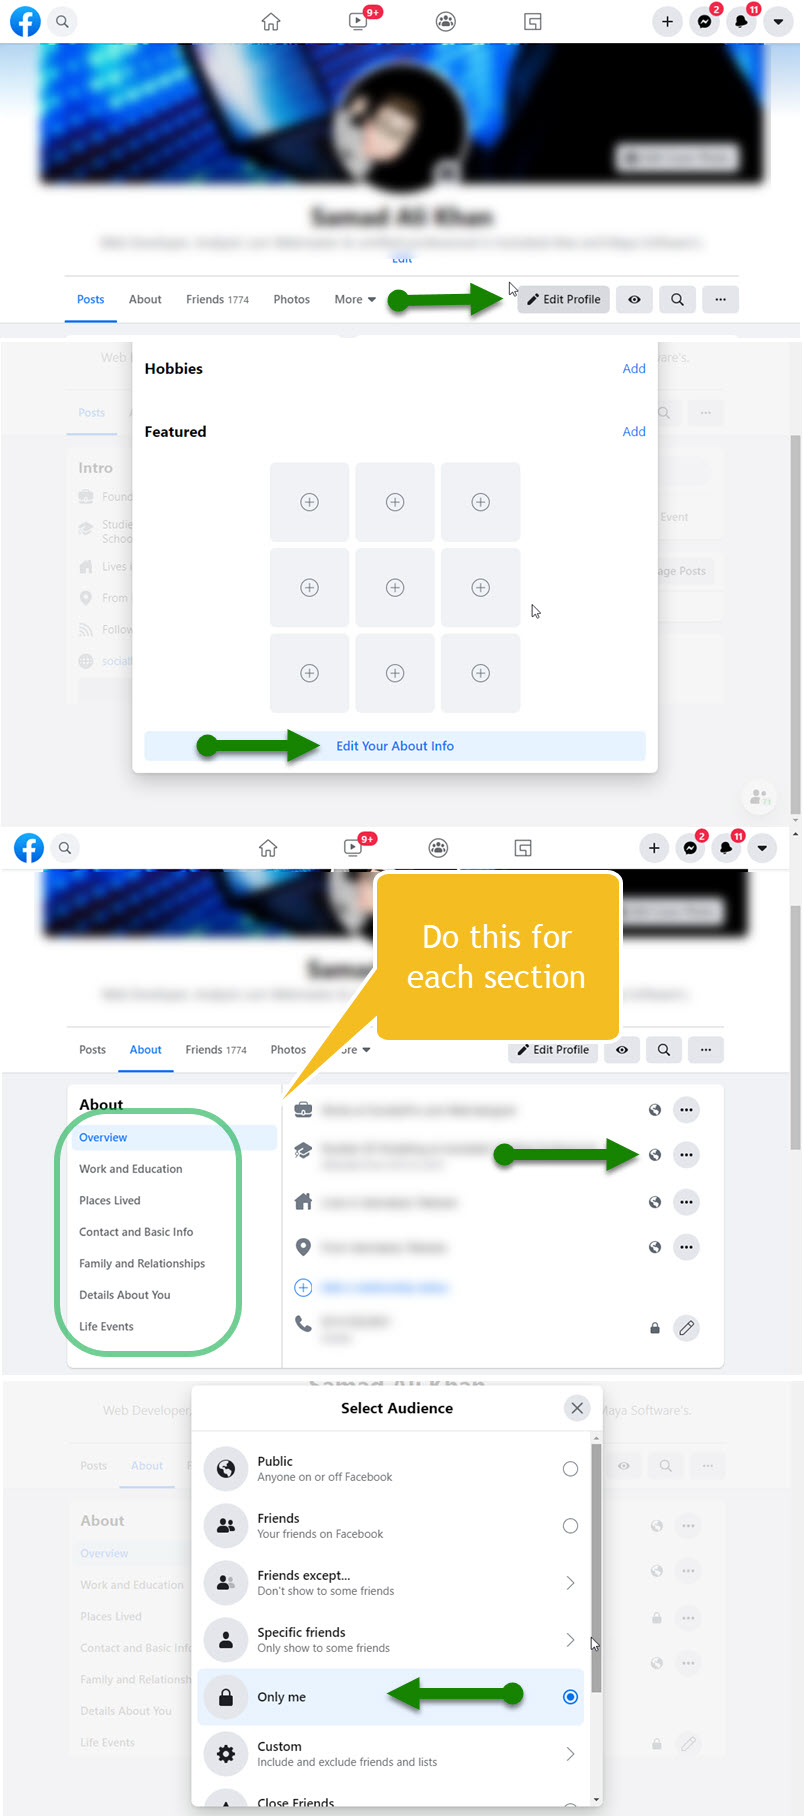
Go to your profile on Facebook. Then click the Edit Profile button. Now click Edit Your About Info and select each category under the About one by one and then click the Globe (Public icon) next to each sub-category. Now click the “Only Me” option for every setting there you wanna make private.
For example, If I want to make my phone number private, then I will click the Overview section under The About section and then Globe (public icon) next to my Phone Number. I will then select the “Only Me” option and that is it.
Hide Your Friends List On Facebook
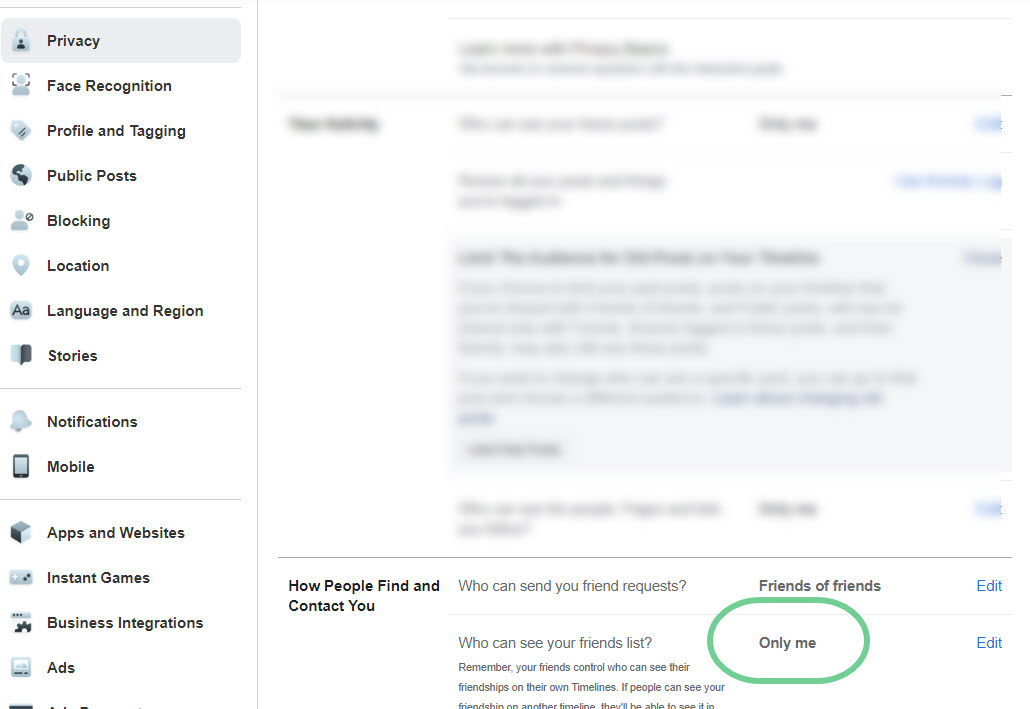
Facebook lets easily hide or private your friends list on the platform. But each of your friends is responsible and the only manager to manage their own friend lists on their timelines. Thus you can hide your friend list by following this method:
Click the dropdown menu icon at the top right, then click Settings & Privacy, and then Settings. Click the Privacy tab at the left sidebar then the Edit option next to “Who can see your friends list”. Select Only Me and you are good to go.
Make Your Future Posts Private
You are the only owner and responsible person for your posts on Facebook. So you can decide who can see your future posts are on Facebook, you can also set the option to Only Me to stop anyone from seeing your future posts. However, the suggested option you may wanna set is “Friends”. Here is how to make your Future Posts Private on Facebook:
Go to facebook.com/settings. Now click the Privacy tab on the left sidebar. Click the Edit option next to Who can see your future posts under the Your Activity section. Set the option to Friends only or Only Me and done. This action will make your future posts private on Facebook.

Hide or Limit Your Published Posts
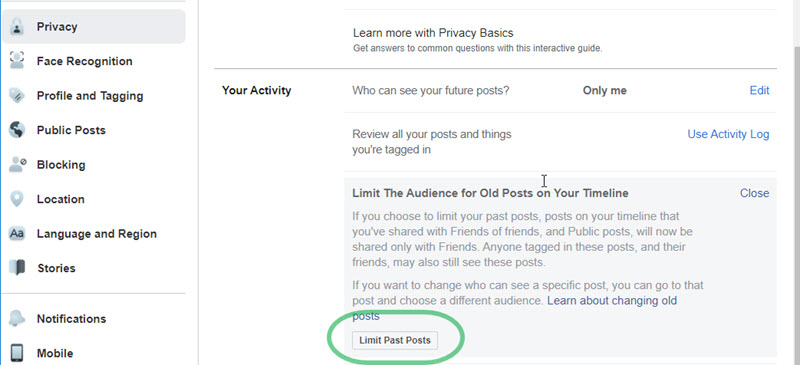
You can easily limit the audience for your published or shared posts on your Facebook timeline. Unfortunately, you cannot make your shared Facebook posts completely private. Thus you can limit the audience for them. This will set the audience for those shared posts to Friends only. Here is how to do it:
Go to Settings on Facebook, then click the Privacy tab on the left sidebar. Now click the Limit Past Posts option under your Activity section. Then click the Limit Past Posts button. Moreover, you can go through each of your shared posts one by one and set a different audience for them.
Make Your Facebook Profile Unsearchable
Facebook lets anyone find you via your email address or phone number. I have told you how to hide your phone number in the About section but what if someone is searching for you by other methods on Facebook? Well, there is a setting you need to manage to stop others from finding you on Facebook. In short, you can make your Facebook profile unsearchable. You can stop people look you up using your email address and phone number, using this method:
Go to Settings then click the Privacy tab on the left. Now in the “How People find and contact you” section click Edit next to “Who can look you up using your email address” and set the option to Only Me. Then click Edit next to “Who can look you up using your phone number” and set the option to Only Me.
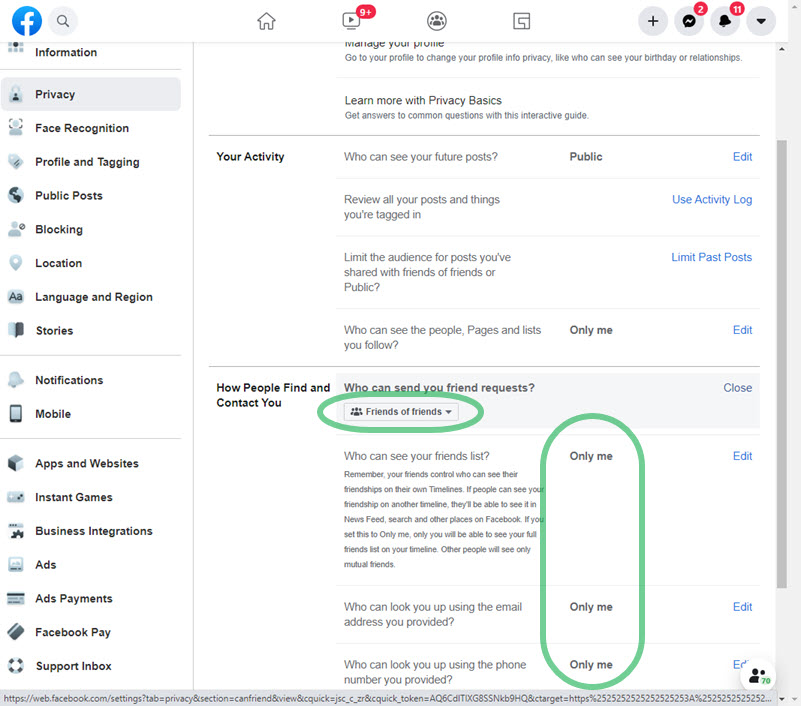
Moreover, to stop non-friends from sending you friend requests, click the Edit option next to “Who can send you friend requests” and set this to Friend of Friends. However, people who know your username on Facebook can still find you.
Profile and Tagging Privacy Settings
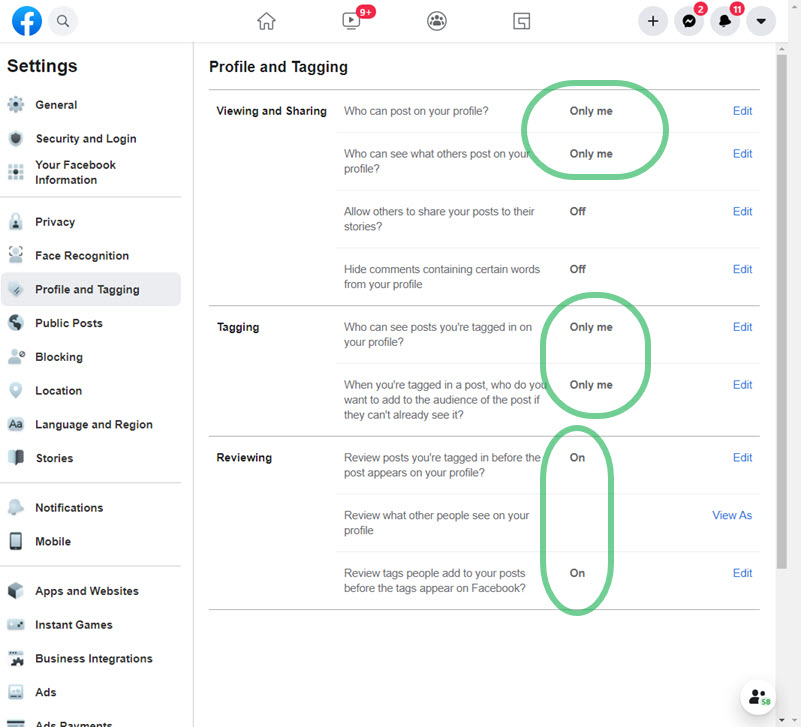
Facebook lets you manage your profile and tagging privacy on the platform. Furthermore, there are three sections you can manage to make things on your profile private and manage some tagging settings. Viewing and Sharing settings for your posts, Tagging, and Reviewing Things before they appear on your profile. Go to Settings then Privacy follows the below methods.
Viewing and Sharing
You can easily stop others on Facebook to share posts on your profile. Also, stop them from seeing what other people posts on your Facebook profile, and don’t let them share posts as your stories. However, Set the options for each setting as below:
- Who can post your profile: set it to Only Me.
- Who can see what others posts on your profile: set it also to Only Me.
- Turn Off allowing others to share your posts to their stories on Facebook.
Tagging
Some friends on Facebook can tag you in their posts. Then those posts appear on your profile. You can stop people to see those posts on your profile you’re tagged in. You can make such posts private using this method: Go to Settings then the Privacy tab navigate to Tagging section. Set the options as below.
- Who can see posts you’re tagged in your profile: Set it to Only Me.
- Whenever you are tagged in a post, who do you want to add to the audience if they cannot already see it: Set this option also to Only Me.
Reviewing
The most interesting part, when someone tagged you in their posts, you can review such posts before they do appear on your Facebook Profile. You can also review tags people add to your posts before that specific tag appears on Facebook. However, set the options as below:
- Review posts you are tagged in before such posts do appear on your timeline or profile: Set the option to Only Me.
- Reviews Tag: set the option to ON.
Now you are in full control, you can easily review everything before appearing on your Facebook timeline or profile. Moreover, the above are the best options you can set to make your Facebook profile private as much as possible.
Make People, Pages, and Lists You Follow Private
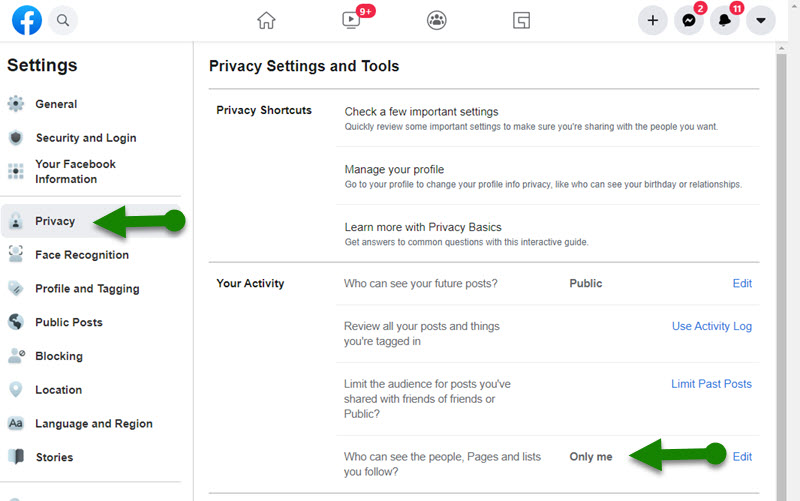
Facebook is the best place to make friends around. Thus you may follow your friends and family members, pages, and favorite celebrities online on Facebook. Then you don’t wanna let others know about anyone, any page, etc you follow. Here is how to make pages, people, and lists private:
Visit the Settings page in your Facebook account. Click Privacy at the left. Under the “Your Activity” section click Edit next to “Who can see people, pages, and lists you follow”, set the option to Only Me, and done.
Block Annoying Facebook Friends
If you wanna make your Facebook account private because of some annoying friends. Then don’t, you can simply block them and Facebook will make your full account private to them. They won’t be able to find you, see things you are sharing, etc. However, later on, you can unblock them if you want. Here is how to block them:
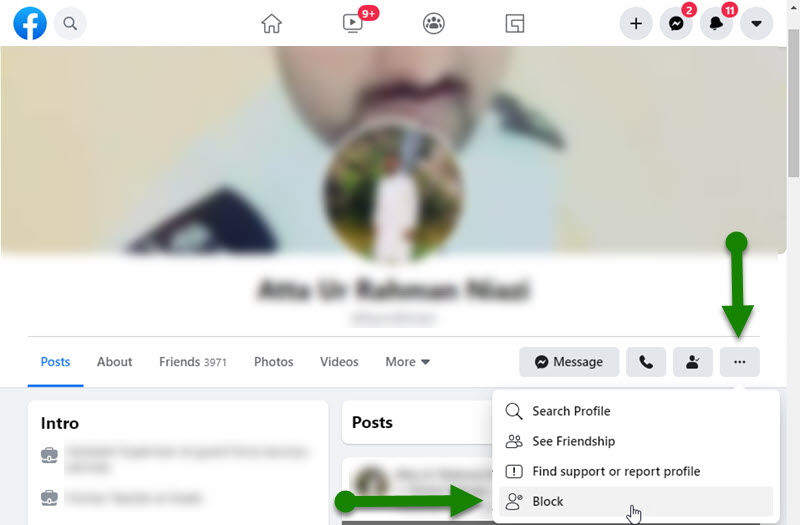
Go to any of the friend profiles you wanna block. Then click click the three-dot button under their profile name. Click the Block option to block that friend, that is it, this is how you can block some annoying friends on Facebook.
How to tell if a Facebook profile is private?
It’s easy to find if a profile on Facebook is private. First, visit the person’s profile, if you don’t see information like his bio, description, friends list, interests, and related stuff. Even you may see his profile picture. Then consider that is a private profile on Facebook. It is that simple, you can make your profile private too, just follow the best privacy settings mentioned above.


In it something is. Many thanks for the help in this question. I did not know it.