Sync and Unsync Contacts on Facebook / Messenger
If you wanna find someone on your phone’s contacts list on Facebook. Then Contacts Sync is a great feature. However, you have options to enable continuous phone contacts uploading and manage them e.g remove the uploaded contacts anytime from Facebook. Thanks to Facebook for such a great feature. But if you care about privacy online and/or using a private phone number, then you should not enable such settings in your Facebook account.
Moreover, you have the option to manage such settings everywhere. I mean you can enable and disable or unsync the continuous contacts sync on Facebook using Android, iOS devices, and PC. Though the regular Facebook version, Facebook Lite on both Android and iOS devices has the same feature and you can manage contact uploading.
Keep in mind that Facebook will continuously upload your phone contacts into your account when the options are enabled. However, you can remove the list anytime you want. We have also explained everything to manage contacts sync on Instagram. Anyways, let’s get to know the procedure to enable and disable contact Syncing on Facebook and Messenger apps.
In This Article
How to Enable and Disable Contacts Sync on Facebook
There are serval methods you can follow to do so. You can do it on your mobile, using the Facebook regular and Facebook Lite versions. I am going to show you everything step by step for all these devices. Then you can choose the method, that is easy for you. Now let’s get started…
Enable Contacts Sync on Facebook
To turn on continuous contacts uploading or contact sync in Facebook, follow these steps: Open the Facebook app, then tap the Menu three lines button. Tap Settings & Privacy then Settings. Tap Profile Settings then tap Media and Contacts. Enable the toggle next to the “Continue Contacts Upload” options. Facebook will start uploading your phone contacts to your account.

Disable/Unsync Contacts on Facebook
You can stop Facebook from accessing your contacts on Android. To turn OFF continuous contacts uploading or contact sync on Facebook, follow these simple steps:
Open the Facebook app, and Go to Menu (three lines button). Now tap Settings & Privacy then tap Settings. Tap Profile Settings and go to Media and Contacts. Disable or turn off the toggle next to the “Continue Contacts Upload”. Facebook will now stop uploading/unsync your phone contacts. Even this way, you can stop Facebook from suggesting friends from your contacts

How to Unsync Facebook Contacts on iPhone
Updated: You can stop Facebook from syncing with your phone contacts on your iPhone. Even you unsync Facebook contacts with these simple steps:
Open the Facebook app on your iPhone. Tap Menu at the bottom right. Now tap Settings & Privacy then Settings. Tap Profile Settings and select “Upload Contacts” under Media and Contacts. Disable the toggle next to the Upload Contacts option. This will unsync Facebook contacts with your iPhone.

Keep in mind that this action will also delete contacts that have already been uploaded to your account. If you want it, go ahead and manually remove or delete them anytime. To delete or remove the uploaded contacts list from Facebook, follow this method:
Deleted Contacts You’ve Uploaded to Facebook
Once You enable the Contacts Sync feature, Facebook automatically starts uploading your phone contacts. Thus you can simply turn off the contact sync and it will auto-deleted the uploaded contacts. However, what if you wanna delete the full list yourself and then turn off the feature? Don’t worry you can delete that full list of contacts you’ve uploaded to Facebook, all you need is:
Go to facebook.com and log in to your account using your PC. Then go to the Manage Contacts You’ve Uploaded section, as you can see the full list of the uploaded contacts over there. You can view the list and just delete all the contacts, click the “Delete All” button at the top of the list, done.

How to Enable and Disable Contacts Sync on Messenger
You can also manage your phone contacts in the Facebook Messenger app. You can choose to enable and disable the contact upload and delete the list of contacts you have uploaded to your Messenger account. Let’s get started with enabling the feature first:
Enable Contacts Sync in Messenger
You can enable the contacts to upload feature on Facebook and let the app sync your phone contacts continuously. Here is how to do it: Open the Messenger app, tap your profile photo at the top left, scroll down, and tap “Phone Contacts”. Now tap the “Upload Contacts” option and enable the toggle over there. Messenger will continuously keep uploading your phone contacts to your account.

Disable Contacts Sync in Messenger
The choice is yours but you can disable the contacts to upload option in the Facebook Messenger app. This way you can stop Messenger from uploading your phone contacts to your account. Here is how to disable contacts upload in Messenger:
Open the Messenger app, and go to your profile (tap your profile photo at the top left). Now scroll down then tap “Phone Contacts”. Tap the “Upload Contacts” option, then tap disable the toggle over there, done. Messenger won’t be able to upload your phone contacts anymore.

Delete Phone Contacts in Messenger
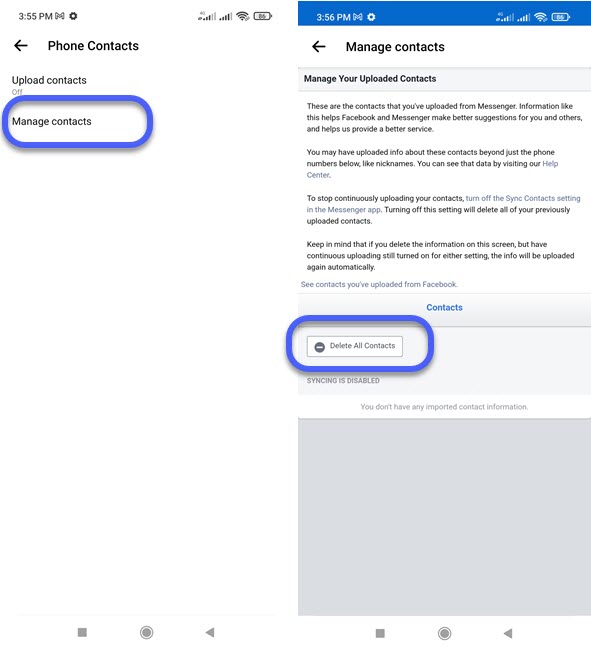
You can delete all the contacts uploaded from your phone to your Messenger account. Here are the simple steps you need to follow: Open the Messenger app > tap Menu then Settings at the top left > Phone Contacts > Manage Contacts > Tap the “Delete All” button. That is how easily you can get rid of the contacts you have uploaded to your Messenger account.

How to Stop Facebook from Syncing Contacts
You can stop Facebook from syncing contacts using these simple steps: Go to the Facebook app, then Menu (three lines at the top). Now tap Settings & Privacy > Settings > Profile Settings > Media and Contacts. Now disable the toggle you see next to “Continuous Contacts Sync”.
The above are the easy steps to stop From from syncing your phone contacts. However, note that this action will remove or delete the complete list of the uploaded contacts from your Facebook account. You can also manually delete that list, but if you don’t want to, then keep the Contacts Sync option enabled.
Stop Facebook Messenger from Syncing Contacts
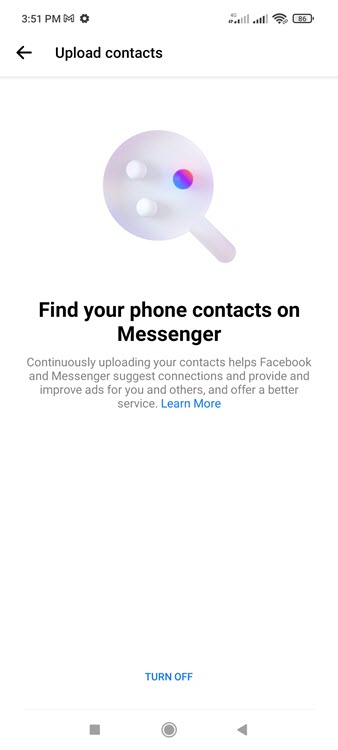
You can disable the Contacts Upload in Messenger to stop it from syncing contacts. However, you can stop Messenger from contacts using these simple steps: Open the Messenger app on your device > Tap Menu then the Settings icon at the top > Phone Contacts > Upload Contacts > Tap the Turn Off option.
This is exactly how to stop Facebook Messenger from uploading your contacts. Moreover, this may or may not remove the complete list of the uploaded contacts. Though you can manually delete the full list of the uploaded ones using the above-mentioned methods. Need more information? comment below.

